If you’re a Mac user, you know that finding good software can sometimes be a challenge. But when it comes to programming, there’s one language that is essential: Java. In this article, we’ll show you how to download and install Java on your Mac.
We’ll also provide some troubleshooting tips in case you run into any problems.
- Go to the Oracle website and click on the download button for Java 2
- Accept the terms and conditions and click on the Mac OS X x64 link to download Java 3
- Once the file has downloaded, open it up and run through the installation process 4
- Once Java is installed, you can verify that it is working by opening up a terminal window and typing in “java -version”
- You should see something like “java version 1
- 0_74″
How to Install Java JDK on Mac OS X [2022]
Install Java on Mac Terminal
Assuming you have already downloaded the Java JDK (http://www.oracle.com/technetwork/java/javase/downloads/index.html), we will now cover how to install Java on Mac Terminal. If you need help downloading the JDK, please refer to this previous blog post (https://blog.udemy.com/how-to-install-java).
1) Open a new Finder window and navigate to the folder where you downloaded the JDK .
dmg file. For example, if you downloaded the file to your Downloads folder, your path would be: /Users/YourName/Downloads
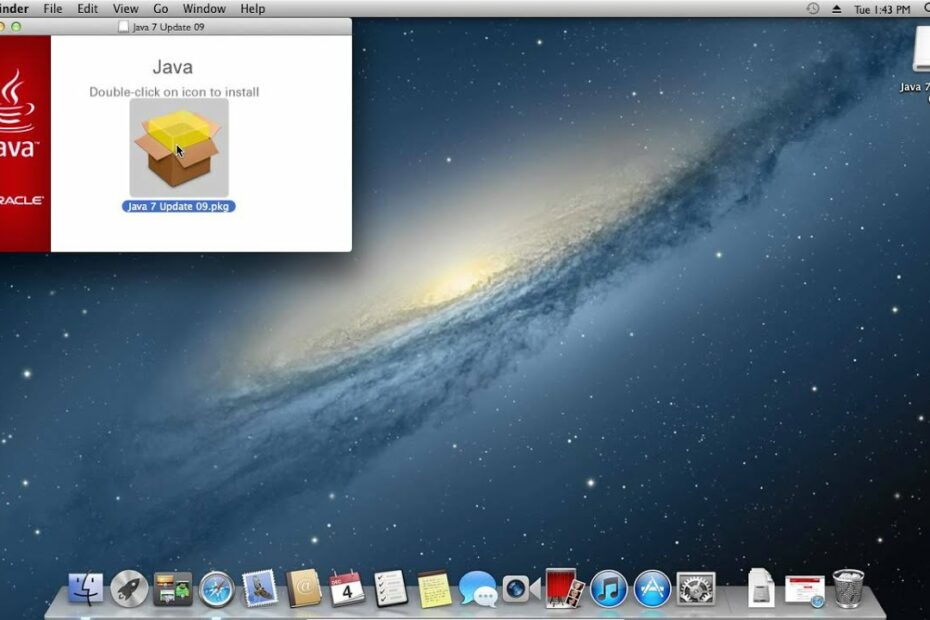
2) Double click on the .
dmg file to open it up and then double click on the icon that appears called “InstallJDK”
3) You will see a pop-up window asking if you want to allow this app to make changes, click “Yes”
4) The installation process will begin, once it is complete you can close out of the installer window
5) Now we need to tell our computer where to find the JDK files that were just installed. To do this, open up Terminal (located in Applications > Utilities). Once Terminal is open, type in or copy and paste the following command:
export JAVA_HOME=$(/usr/libexec/java_home)
6) Press Enter and then type in java -version , again press Enter. If everything was installed correctly, you should see something like this appear: java version “1.8..0_144” 7) That’s it!
You are now ready to use Java on your Mac!
Install Java on Mac Brew
If you want to install Java on your Mac using Brew, there are a few things you need to know. First, make sure that you have Homebrew installed. If you don’t, you can get it here.
Once you have Homebrew installed, open up a terminal window and type in “brew update”. This will update Brew’s formulas. After the update is complete, type in “brew tap caskroom/cask”.
This will add the Caskroom repository to Brew. Now we’re ready to install Java.
There are two ways to install Java using brew cask.
The first way is to install the latest version of Oracle Java SE Development Kit (JDK). To do this, type in “brew cask install java”. The second way is to install a specific version of Oracle JDK.
For example, if you want to install Oracle JDK 8u144, type in “brew caskinstall java8”. You can also specify the exact version number if needed.
Once the installation is complete, verify that Java is properly installed by running “java -version” in the terminal.
You should see something like this: java version “1.8.0_144”
Java(TM) SE Runtime Environment (build 1 . 8 . 0 _ 144 – b01 ) Java HotSpot(TM) 64- Bit Server VM ( build 25 . 144 – b01 , mixed mode) Congrats! You’ve successfully installed Java on your Mac using Brew!
Install Java 8 on Mac
Assuming you have already downloaded Java 8 from the Oracle website, we will now go through the process of installing it on your Mac. Keep in mind that you will need to have administrative privileges in order to install Java 8.
1) Locate the downloaded file and double-click on it to launch the installer.
2) Click Continue on the Welcome screen.
3) Review and agree to the terms of the Oracle Binary Code License Agreement by checking the “I accept the terms in the license agreement” radio button and then click Continue.
4) On the Installation Type screen, select “Install for all users of this computer” option and click Install.
Note: You can also choose to install Java 8 only for your current user which can be useful if you don’t have administrative privileges.
5) Enter your password when prompted and click Install Software.
6) The installation process will now begin, please wait until it is complete.
7) Once installed, click Close to close out of the installer.
8) That’s it! You’ve successfully installed Java 8 on your Mac!
Install Java on Mac M1
If you have a Mac with an M1 chip, you can install and run Java using these steps:
1. Download the latest version of Java from the Oracle website. Be sure to select the “Mac OS X” option under “Platform.”
2. Open the downloaded file and follow the prompts to install Java.
3. Once Java is installed, open your System Preferences and go to the “Other” section. Here, you should see a new icon forJava Preferences.
Click on this to open it up.
4. In the Java Preferences window, make sure that both the “Enable applet plug-in and Web Start applications” and “Show Developer menu in menu bar” options are checked/enabled.
5. Close out of Java Preferences and then launch any web browser (Safari, Firefox, Chrome, etc.).
Type in “https://www.”java .com/en/” into your browser’s address bar and hit Enter/Return to load up Oracle’s website.
If everything was successful, you should now see a message saying that you have successfully installed Java on your Mac M1!

Credit: java.tutorials24x7.com
Can You Install Java on a Mac?
Yes, you can install Java on a Mac. There are two ways to do this: using Homebrew or manually downloading the JDK from Oracle.
Homebrew is a package manager for macOS that makes it easy to install and update software.
To install Java with Homebrew, run the following command: brew cask install java. This will install the latest version of the JDK (currently 11).
Alternatively, you can download the JDK directly from Oracle’s website.
Scroll down to the “Java SE Development Kit 11” section and click on the link for your operating system (macOS x64 in this case). This will download a .dmg file containing the installer.
Run this file and follow the prompts to install the JDK.
How Do I Download Java on My Mac 2022?
If you’re running macOS Catalina (10.15) or later, you need to install Apple’s Xcode development software first. Once you’ve done that, open a Terminal window and type the following command:
xcode-select –install
This will prompt you to install the Xcode Command Line Tools. Click Install to continue.
Once the installation is complete, you can move on to installing Java.
There are two ways to install Java on your Mac: using Homebrew, or manually downloading and installing the JDK from Oracle’s website. We’ll show you both methods below.
Installing Java with Homebrew (Recommended)
Homebrew is a package manager for macOS that makes it easy to install various software on your computer. It’s recommended that you use Homebrew to install Java on your Mac, as it makes it easier to keep your installations up-to-date. To install Homebrew, open a Terminal window and type the following command:
ruby -e “$(curl -fsSL https://raw.githubusercontent.com/Homebrew/install/master/install)” < /dev/null 2> /dev/null ; brew install caskroom/cask/java11
brew tap AdoptOpenJDK/openjdk
You’ve successfully installed OpenJDK 11 on your Mac.
How Do I Enable Java on My Mac?
Assuming you have a Mac with a Safari browser:
1. Go to the Apple icon in the upper left corner of your screen and select “System Preferences.”
2. Click on the “Security & Privacy” icon.
3. Under the “General” tab, click on the lock in the lower left corner to unlock it. You will need to enter your password at this point.
4. Once unlocked, look for “Allow applications downloaded from:” and select “Anywhere.”
5. A message will pop up asking if you’re sure you want to do this; select “Allow From Anywhere.”
6. Now go to Safari’s Preferences by selecting Safari > Preferences from the menu bar, or by pressing Command-, (comma).
7. Select the Security tab and then check Enable Java under Web Content:
Java is now enabled on your Mac!
How Do I Install Jdk on Mac?
Assuming you have already downloaded the JDK (Java Development Kit) file from the Oracle website, here are the steps to install it on your Mac:
1. Open the JDK file and double-click on the icon to run the installer.
2. A window will appear asking you if you want to allow the program “Installer” to make changes to your computer.
Click “Yes”.
3. The Installer will now launch and guide you through the installation process. Simply follow the instructions on screen until the process is complete.
4. Once installed, open up a Terminal window and type in “java -version”. This should return something like “java version 1.8….” which indicates that Java is successfully installed on your system!
Conclusion
If you’re a Mac user, you know that there’s no shortage of great software to download. But what if you want to run a program written in Java? You’ll need to download the Java Runtime Environment (JRE) first.
Here’s how:
1. Go to the Oracle website and download the JRE for Mac OS X.
2. Double-click on the downloaded file to launch the installer.
3. Follow the prompts to install Java on your computer.
Now you’re all set! You can now run any Java-based program on your Mac.

