There are a number of reasons why you might want to root your Bluestacks Android Emulator. Perhaps you want to run a specific app that requires root access, or maybe you just want to customize the emulator to your liking. Whatever the reason, there are a few different ways to go about rooting Bluestacks.
In this article, we’ll show you how to root Bluestacks using two different methods.
There are many reasons why you might want to root your Bluestacks Android emulator. Perhaps you want to run a custom ROM or use apps that require root access. Or maybe you just want to tweak some settings that are only available when you have root privileges.
Whatever your reason, here’s a step-by-step guide to help you do it.
Before we get started, there are a few things to keep in mind. First, rooting voids your warranty and could potentially brick your Bluestacks installation.
Second, this process is not officially supported by Bluestacks, so use it at your own risk. With that said, let’s get started!
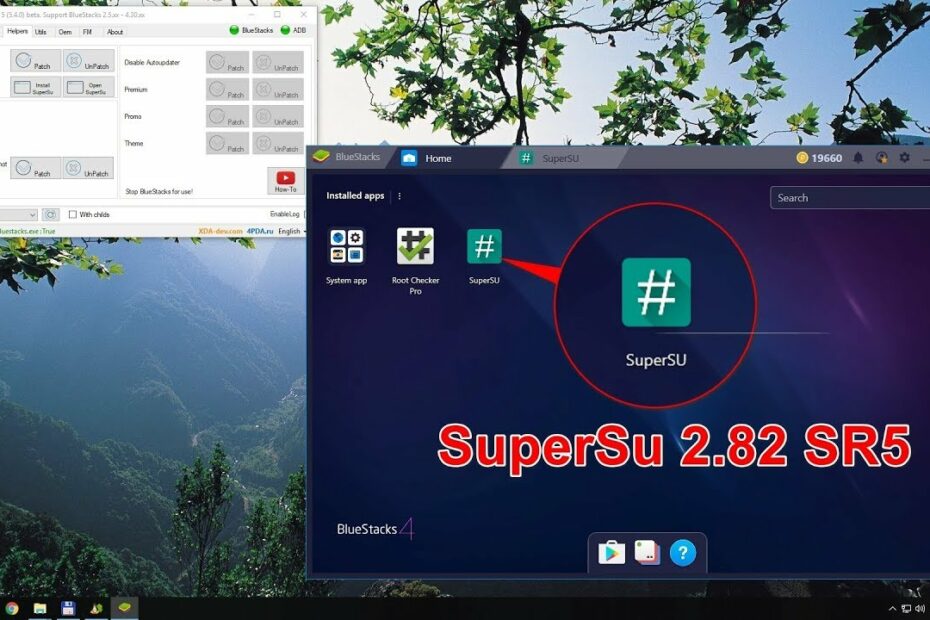
1) Download the latest version of SuperSU from here and save it to your desktop.
2) Connect your Bluestacks device to your computer via USB and copy the SuperSU file over to the internal storage.
3) Launch Bluestacks and open the SuperSU app. You will be prompted to grant root privileges, so go ahead and hit “Grant” (or “Allow”, depending on which version of Android you’re running).
4) Once SuperSU is open, hit the “Settings” button and then check the option for “Enable SU during boot”. This will ensure that root access is maintained even if Bluestacks is restarted or updated.
5) That’s it!
You should now have full root access on your Bluestacks device! Enjoy!
Root Bluestacks 5 (No downloads, x64/x32) | LATEST | Working 2022
Credit: www.theworldsbestandworst.com
What is Root Bluestacks
Root Bluestacks is a process that allows you to access and modify the Android operating system files on your computer. This process is usually used by developers to test their apps on a computer before they release them onto the Google Play Store. However, it can also be used by regular users to customize their Android experience or to run certain types of apps that are not available on the Play Store.
Root Bluestacks is not an easy process and it voids your warranty, so it should only be attempted if you are confident in your abilities.
How Can I Root Bluestacks
There are many methods for rooting Bluestacks. The most common method is to use the SuperSU app. Other methods include using the KingoRoot app or Bluestack Tweaker.
Once you have rooted your Bluestacks, you will have access to all of the Android operating system’s features and settings. You can install any Android apps, including those that require root access.
What are the Benefits of Rooting Bluestacks
Rooting BlueStacks comes with a number of benefits. By rooting BlueStacks, you can install any Android app on your computer, even if it is not available on the Play Store. You can also overclock the processor to improve performance, or underclock it to save battery.
Moreover, you can access the system files and make changes to them. Finally, you can also take a full backup of your apps and data.
Conclusion
Root Bluestacks is a process that allows you to gain access to certain features on your Android device that would normally be restricted. This can be useful for things like removing bloatware, or accessing features that are only available to rooted devices. The process is relatively simple, and there are a few different ways to go about it.
However, it’s important to note that rooting your device will void your warranty, so proceed with caution.

