There are a few different ways that you can go about converting your YouTube playlist into iTunes. One popular method is to use a third-party software program like iMyFone TunesMate. This program allows you to transfer all kinds of files between your computer and iOS devices, including music, videos, photos, and more.
Plus, it’s super easy to use – just connect your device to your computer and launch the program. Then, select the ‘YouTube to iTunes’ option and follow the prompts on screen.
If you’re a fan of both YouTube and iTunes, you might be looking for a way to convert your favorite YouTube playlists into iTunes. Luckily, there’s an easy way to do this using a free online converter.
To start, go to the Online Video Converter website and enter the URL of the YouTube playlist that you want to convert.
Then, select MP3 as the output format and click on the Convert button.
Once the conversion is complete, click on the Download button to download the converted file. Finally, open iTunes and import the downloaded file into your library.
That’s it! Now you can enjoy your favorite YouTube playlists offline in iTunes.
Convert YouTube Playlist to Spotify or Apple Music
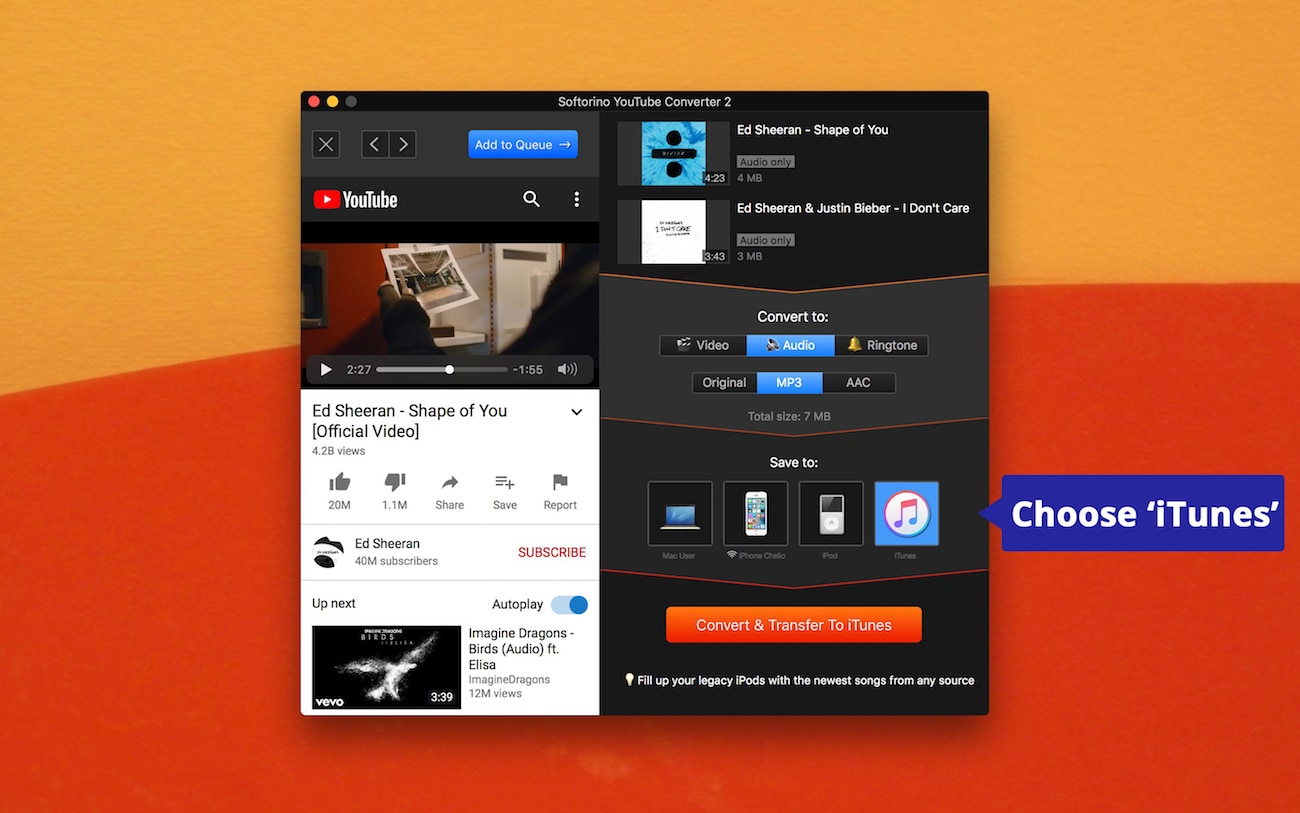
Credit: softorino.com
How Do I Convert a Youtube Playlist to Itunes
There are a few different ways that you can convert a YouTube playlist to iTunes. One way is to use a third-party converter tool. Another way is to use the built-in export feature in YouTube Music.
And finally, you can also manually add the songs from your YouTube playlist to your iTunes library.
If you want to use a converter tool, there are a few options available. One popular option is TuneFab Spotify Music Converter (https://www.tunefab.com/spotify-music-converter/).
This tool can not only convert Spotify playlists to MP3 files, but it can also work with YouTube playlists. It’s pretty easy to use – just copy and paste the URL of your YouTube playlist into the program and then click “Convert”. You can choose what quality level you want the output files to be, and you can also decide whether or not you want TuneFab to keep the original song title and artist name when converting the files.
If you don’t want to use a third-party tool, then you can try using YouTube Music’s built-in export feature. To do this, first make sure that you have the latest version of YouTube Music installed on your computer. Then open up the playlist that you want to export in YouTube Music and click on the “…” menu button next to the playlist name.
From there, select “Export Playlist” and then choose “iTunes” as your output format. This will create an .m3u file which you can then import into iTunes by going into File > Library > Import Playlist in iTunes.
Finally, if neither of those methods work for you or if you just prefer doing things manually, then you can always add each song from your YouTube playlist individually into your iTunes library. To do this, first open up iTunes and go into Preferences (you can find this under the Edit menu on Windows or under the iTunes menu on Mac). Under General > Import Settings, make sure that MP3 Encoder is selected as your import format (it probably already is by default).
Then go back intoYouTube Music and start playing each song from your playlist one by one in order from beginning to end.
Is There a Way to Download a Youtube Playlist Directly to Itunes
Yes, there are a few ways to download a YouTube playlist directly to iTunes. One way is to use a third-party app like iMyFone TunesMate. With TunesMate, you can easily transfer YouTube playlists (and other media) to iTunes without having to go through the hassle of downloading each video individually.
Another way to do this is by using a website like Flvto.com. On Flvto, you can simply paste in the URL of the YouTube playlist that you want to download, and it will generate an iTunes-compatible file for you which you can then add to your library.
Finally, if you have a Mac, you can use the built-in Automator app to create a workflow that will automatically download YouTube playlists and add them to your iTunes library.
This method requires a bit more setup than the others, but it can be helpful if you want to automate the process of adding new YouTube playlists to your iTunes collection.
How Can I Add My Favorite Youtube Songs to My Itunes Library
If you’re anything like me, you have a hard time finding new music that you enjoy. Thank goodness for YouTube! I can spend hours on there watching my favorite YouTubers and listening to the songs they use in their videos.
But what if I want to add those songs to my iTunes library so I can listen to them offline or on my phone? Here’s how:
First, open up iTunes on your computer.
Then, go to YouTube and find the song you want to add to your iTunes library. Copy the URL of the video from the address bar at the top of your browser.
Next, go back to iTunes and click on File > Add To Library.
Paste the URL into the box that pops up and click Open. The song will start downloading into your iTunes library!
Conclusion
Assuming you would like a summary of a blog post on how to convert a YouTube playlist to iTunes:
iTunes is a great media player and organizer, and it’s perfect for syncing music with your iPhone, iPad, or iPod. If you have a large collection of music on YouTube that you want to listen to offline, or transfer to your iOS device, you can use a free web service called FLVTO to download and convert the YouTube videos into iTunes-friendly formats.
Here’s how:
1. Go to FLVTO.biz in your web browser and click the green “Convert” button near the top of the page.
2. Enter the URL of the YouTube playlist that you want to convert into the field at the top of the page and click “Start.” 3. On the next page, select MP3 as your output format from the drop-down menu and click “Convert Now.” 4. When prompted, choose whether you want to download all songs in the playlist as one ZIP file or individually.
5. Click “OK” when asked if you’re sure you want to start conversion process. 6. Wait for FLVTO to finish converting your YouTube playlist into MP3 files; this may take several minutes depending on how long the playlist is and how many songs it contains. 7. Once conversion is complete, click “Download Converted Files” 8to save them locally on your computer 9in whichever folder you select).

